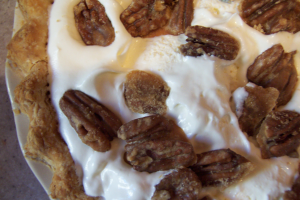
Here is another tasty pie recipe...just in time for the holidays. It adorned my Thanksgiving table, and may make a repeat appearance on my Christmas table. Yes, it was that good! The recipe is courtesy Paula Deen.
Apple Butter Pumpkin Pie
1 cup apple butter
1 cup fresh or canned pumpkin
1/2 cup packed brown sugar
1/2 teaspoon salt
3/4 teaspoon ground cinnamon
3/4 teaspoon ground nutmeg
1/8 teaspoon ground ginger
3 eggs, slightly beaten
3/4 cup evaporated milk
1 unbaked 9-inch pie shell
Sweetened whipped cream, for garnish
Preheat oven to 425°F.
Combine apple butter, pumpkin, sugar, salt and spices in a bowl. Stir in eggs. Gradually add milk and mix well. Pour into pie shell. Bake for about 40 minutes or until set.
Cook's Notes:
-If the crust begins to burn, place tin foil around the crust and lower the temperature of the oven.
-A tasty topping for this pie is Pecan Pralines.
I love the way this pie uses pumpkin and apples to make a pie full of spices. The apple butter packs a double punch. Not only do you get a hint of apple flavor, but it also adds it's own spices to the flavors. The pie has a slightly different texture than regular pumpkin...an improvement in my book.
Labels: apples, desserts, pies, pumpkin
By: Sharon Pickering | 11/27/2006 at 1:32 PM | | If you want, you can leave a comment by clicking here.
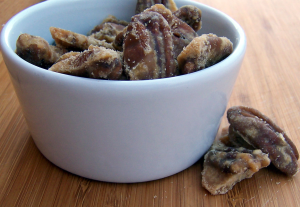
If it is praline goodness is what you are yearning for, look no further. This recipe will make you and all those around you happy! Great to give as gifts in a pretty little jar, or keep for yourself and sprinkle over a dish of vanilla ice cream.
Pecan Pralines
Makes About 4 Cups
2 cups sugar
1 cup buttermilk
1 teaspoon baking soda
2 tablespoons butter
4 to 4 1/2 cups pecan halves
In large (at least 6-quart) heavy saucepan, cook sugar, buttermilk, and soda on medium-high heat to soft-ball candy stage. (Syrup has reached the soft-ball stage at 234 to 240 degrees. When a small quantity is dropped in ice water, it forms a ball that keeps its shape, but when removed from the water, it flattens out by itself). Stir frequently to prevent burning. As candy cooks, it will turn golden brown. Remove from heat, and stir butter in . Add pecans, and stir to coat all nuts. Cover counter with wax paper, and pour pecans onto it. Immediately separate pecans. Let cool. Note: Works best when made on a day with low humidity.
I sprinkled mine on Apple Butter Pumpkin Pie!
UPDATE: I have entered this recipe in the Festive Food Fair that is hosted by Anna over at Morsels & Musings. Hurry on over to the Festival and join in!
Labels: appetizer, buttermilk, pecans
By: Sharon Pickering | 11/26/2006 at 3:26 PM | | If you want, you can leave a comment by clicking here.
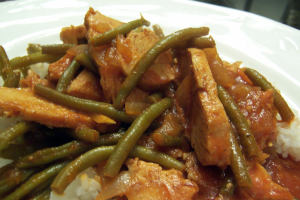
Every once in awhile you come across a dish that is surprisingly good and simple. I do wish I could take credit for this one, but the credit goes to my husband. He got the inspiration from a recipe he found, who knows where, and tweaked it to perfection. I call it Drew's Curry Chicken.
It is warm and satisfying. Usually we serve it on cous cous, but we have also used basmati rice. Either way it is a treat.
Drew's Curry Chicken
2 chicken breasts, sliced
1 onion, chopped
1-3 tablespoons curry powder
1 chicken boullion or 1 can chicken broth
1 small can tomato paste
1 can green beans or 1 cup frozen
1 clove garlic
olive oil
cous cous or rice
Brown onion in oil with garlic. Add chicken and sauté until chicken is no longer pink. Add curry, chicken boullion (mixed with a little water to dissolve) and tomato paste. Add the green beans. (I prefer the frozen.) Simmer for 20-30 minutes. Serve over cous cous or rice.
Added note: If using chicken broth, don't cover when simmering so the sauce reduces. If using a boullion cube, cover when simmering.
When making the cous cous add a chicken boullion cube to it while cooking for added flavor.
Goes great with a fresh loaf of homemade bread and a salad.
Enjoy!!
Labels: poultry
By: Sharon Pickering | 11/25/2006 at 7:02 AM | | If you want, you can leave a comment by clicking here.

I really had not intended on another pie post so soon, but there have been some crust questions that must be answered. First off - people - don't be afraid of the crust. It is only a little pile of flour, shortening, salt and water. That is it. Nothing magical. Nothing mysterious. About as plain as it can get. But, if you simply can not muster up the courage to tackle the crust, my suggestion is - drink a glass of wine. Yes, a glass of wine is guaranteed to take the edge off and that crust will almost roll its self. Thinking about it, a glass of wine is how most of my cooking sessions start! If one doesn't help, have another. But, I wouldn't recommend more than two. Things will start to go downhill and, well, it could get ugly.
To make a pie crust, you must have certain tools of the trade. Just little items to make it painless.
The Tools:
Wonder Cup
Pastry Frame
Rolling pin
Pastry blender or a food processor
Pie plate
Mixing bowl
Spatula - I love my spatula for tossing the cold water in the flour
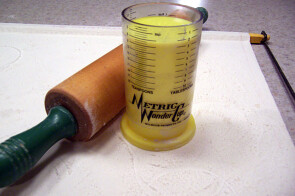
How would you measure 2/3 cup of shortening? I use the Wonder Cup. The unique design allows for no-struggle, mess-free measuring. To use, push the yellow cylinder down to the measurement mark you need and stuff the cylinder full of shortening, then level it off and push it into your bowl. Much easier than attempting to get your shortening out of a normal measuring cup.
Another pretty handy item to have around is a pastry frame. Not only is it necessary in my book for pie crusts, it is wonderful to roll out biscuits, bread and cookies. The official name of mine is the "Foley Pastry Frame". The unofficial name is "The Happy Thing" - named by my husband because every time I bring it out, he gets happy! It's very old and I don't think they make this particular brand any longer. But, there are other brands out there now. A pastry cloth will do if you can't find a pastry frame. The frame, while being convenient, is not necessary. It helps to hold the canvas 'pastry cloth' in place on your counter. Always remember to flour the canvas well before rolling out your pie crust. When finished using, shake out excess flour, roll up and store. (Mine is in a cardboard tube in a kitchen cabinet.)
The rolling pin is instrumental to the pie making process. Mine is not fancy, and once again very old. Hmmmm....seems most of my favorite, most used kitchen tools are old and well used. Anyway, you can find rolling pins in a variety of materials...marble, glass, steel, hollow plastic, wood. Mine is wood and it works like a pro. I suppose it is just a matter of preference, and I prefer wood. I like the way it looks and the way it feels. My pastry frame came with a stockinette rolling pin cover which keeps your dough from sticking to the rolling pin. Before rolling your crust, rub flour over the stockinette.
The last tools I will talk about are the pastry blender and food processor. For many years I used a pastry blender and never had a problem with it. But, recently I bought a food processor because it seemed like every recipe and every food show used one. Now I know why - they work! But, even after purchasing one, it took me a long time to finally decide to see how it would cut shortening into the flour. (Old habits die hard.) So, if you have a food processor, definitely use it for pie crusts. Put the flour, salt and shortening into the bowl and pulse it until it looks crumbly. I don't use the food processor to add the water, because I feel it would over work the dough at this point. If you don't have a food processor, don't fret over it. Just buy a little pastry blender for a few dollars. It will work just as well and make a wonderful flaky crust.
I can't remember exactly where I got my recipe, but I suspect it was from a Gold Medal flour bag, although I use any flour I have on hand. It has directions for a one-crust or a two-crust pie. Usually I will make both...enough for three crusts because I like to have plenty of pie crust to work with.
The Recipe:
~8 or 9 inch One-Crust Pie~
1 cup Gold Medal Flour
1/2 teaspoon salt
1/3 cup shortening
2 to 3 tablespoons cold water
~8 or 9 inch Two -Crust Pie~
2 cups Gold Medal Flour
1 teaspoon salt
2/3 cup shortening
4 to 5 tablespoons cold water
The Crust:
It is always easier to assemble everything before hand. Not saying that is what I do all the time, but when I do, the process is much smoother. If I really had forethought, I measure the shortening, cut into cubes, put into a bowl and set it in the refrigerator to get chilled. More often than not, my shortening doesn't get chilled. According to "Pie Authorities" that is a big no-no. But, my pies turn out great anyway. So, don't fret about that either. What I do, and I think this does make a difference, is get a little glass of water with ice at the beginning. That way when I'm ready to add the water it is good and cold.
To make the pie crust, add your flour, salt and shortening to a bowl or the food processor bowl if that is what you are using. Cut your shortening into the flour with the pastry blender or pulse the food processor until it resembles something between cornmeal and pea size chunks of flour/shortening.
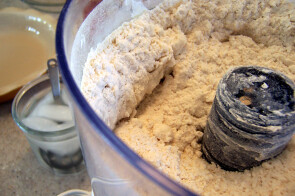
UPDATE: 11/17/06 I've had a couple of people ask what that black thing is. Well, curious readers, that is the center post of my snazzy Wolfgang Puck Food Processor! And that is the flour blended with the shortening in the processor bowl ready for the addition of water.)
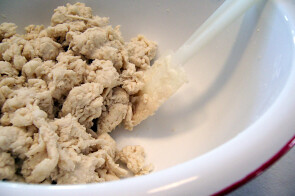
Now the ice water gets added. If using a food processor I empty the flour mixture into another bowl because I don't like working around that middle pole of the processor bowl. Just me. Anyway, adding the ice water is critical. Don't laugh...it is. Too much water and you crust will be tough. Too little water and it will not hold together and crumble when putting it in the pie plate. This is the only part of the whole process that I actually pay attention. I will add the water, one tablespoon at a time, and keep count. I only keep count because it gives me a general guideline. I say guideline because the amount of water added to a pie varies from day to day, depending upon the humidity in the air. After each addition of water, I use a rubber spatula and gently toss the mixture. I keep doing this until the dough starts to form larger clumps and hold together.
Some days I use more water, some days less. You will develop a feel for it.
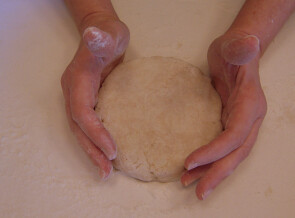
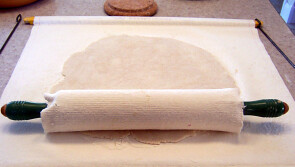
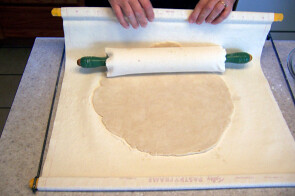
When I think enough water has been added, I press it into a ball, handling it as little as possible. That is the golden rule after adding the water. Handle as little as possible. Anyway, press it into a ball and place on your floured pastry frame or pastry cloth. Press it flat into a disc. With your floured rolling pin, start rolling from the center to the edge. Sometimes I help keep the dough round by pressing the edges into shape with my hands into a circle.
Most times just rolling from the center out will form a nice circle.
Now comes the part that use to make me crazy...getting the crust into the pie plate without it falling apart. I finally found a fool-proof way that works each and every time. If you are using a pastry frame, you will have to disconnect the frame to do this. After the crust is rolled out, place the rolling pin on the front edge of the pie closest to you.
Gently pick up the front edge of your pastry cloth and pull it towards the back edge.
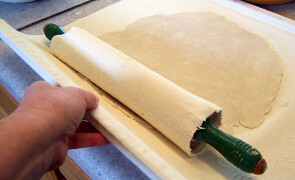
This motion wraps the crust around the rolling pin.

Place the pie plate in front of the rolling pin/crust.
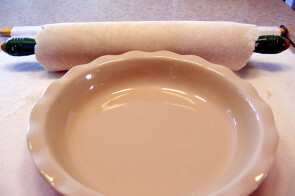
Lift the rolling pin and match the far edge of the crust with the far edge of the pie plate. Unroll the crust over the pie plate and the crust will fall into the pie plate!!
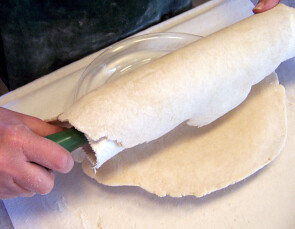
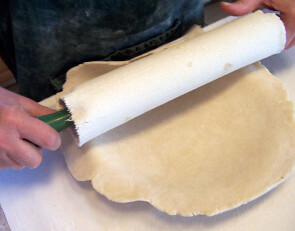
It is the greatest move I have ever perfected in the kitchen. No more torn crusts and patching them up. Perfection.
If you are making a cream pie, dock the crust. (Dock is taking a fork and poking holes in the crust.) Then bake in a 475 degree oven until lightly browned, usually about 10 minutes. If you are making a fruit pie, prepare your filling and put in the crust. You can put a little crumb topping over your fruit.
Crumb Topping:
1/2 cup sugar
1/2 cup flour
1/4 cup butter
Cut butter into flour and sugar until crumbly. Spoon over your fruit filling and bake as ususal.
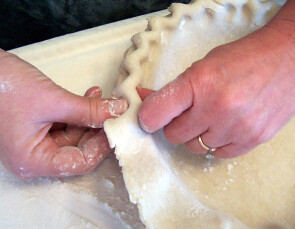
Or if you are making a 2-crust pie, place the top crust over the filling in the same manner as above.
One last thing. Did you know that pie crusts freeze nicely? Most of the time I try to have a frozen pie crust or two in my freezer. I roll it out, put it in the pie plate, crimp the edges and wrap it in plastic.
That way when you want a pie all you do is take it out, put the filling in, make the little crumb topping and bake. Really fast and easy. Great for last minute guests!
Labels: desserts, food processor, pastry, pie crust
By: Sharon Pickering | 11/12/2006 at 5:47 PM | | If you want, you can leave a comment by clicking here.


