
This is a gift from my friend at work who turned out to be my Secret Santa...much to my surprise! I received a beautiful basket filled with homemade items. One of the items in the basket was this Bean Soup Mix in a Jar.
Bean Soup Mix in a Jar
2 cups dry black beans
2 cups dry Great Northern beans (or any small white bean)
2 cups dry red kidney beans
2 cups dry pinto beans
2 cups dry green split peas
In four 1-pint canning jars, layer beans in order given, dividing evenly between jars. For seasoning packets, use four individual small sandwich bags, or four 6-inch squares of plastic wrap or foil.
Into EACH seasoning packet (you'll need FOUR times this amount TOTAL for all four jars of soup mix), place:
3 teaspoons beef (or vegetable) bouillon
3 tablespoons dried chives (chopped)
1 teaspoon salt
1 teaspoon dried savory
1/2 teaspoon ground cumin
1/2 teaspoon black pepper
1 bay leaf
To Prepare Soup:
3 hours before serving, rinse beans with cold, running water. Remove stones or shriveled beans. In a Dutch oven or stock- pot, bring beans and 9 cups water to boil for 3 minutes. Remove from heat and let sit for 1 hour. Drain and rinse beans. Place beans, 5 cups of water, and seasoning packet contents into pot. Heat to boiling, reduce heat to low and simmer gently for 1 1/2 hours until beans are tender. Stir occasionally. Add one 16-oz. can stewed tomatoes with liquid (break up tomatoes). Heat to boiling. Reduce to low, and cook 15 minutes more. Discard bay leaf.
Each jar of soup mix will make approximately 6 - 8 generous servings.
I can hardly wait to make it! I think New Year's Day will be just perfect.
PS/The other items were two cute bottles of Kahlua and a bottle of vanilla. They both deserve their own post!
Labels: beans
By: Sharon Pickering | 12/24/2006 at 11:13 AM | | If you want, you can leave a comment by clicking here.

Not to get the cornbread controversy going, but I need to say up front I'm a fan of the sweet cornbread. This recipe is on the money. It makes a delightful skillet of cornbread that rises high and has a fine texture. If you are a fan of the sweet cornbread, then you will love this recipe!
Buttermilk Cornbread
1/4 pound butter
2/3 cup white sugar
2 eggs
1 cup buttermilk
1/2 teaspoon baking soda
1 cup cornmeal
1 cup all-purpose flour
1/2 teaspoon salt
Preheat oven to 375º. Grease an 8 inch cast iron skillet. Melt butter in skillet. Pour butter into mixing bowl. Return skillet to oven to keep hot. Add the sugar to the butter in the mixing bowl and mix well. Quickly add eggs to butter and beat until well blended. Combine buttermilk with baking soda and stir into bowl. Stir in cornmeal, flour, and salt until well blended and few lumps remain. Pour batter into the hot skillet. Bake in the preheated oven for 30 to 40 minutes.
A few years ago I purchased a cast iron skillet from Good Will. It was not very pretty...had rust. So, I did some research and found this way seemed the best for me. My method involves a self-cleaning oven.
Cast Iron Skillet Seasoning
1. TO PREPARE FOR SEASONING (and burning off old cure): First, scrub any loose rust off. I even took an SOS pad to it. Dry it off. Put in in your oven (do not put grease on it at this time) and run the self-clean cycle. You will probably have some smoke, so turn on the vents. Let it cool completely. When cool, brush off any remaining residue and scrub any left over stubborn spots with an SOS pad again.
2. TO SEASON: Preheat oven to 500º. Using your fingers or a kitchen towel, smear solid shortening over every surface and into every nook and cranny. (Important note here...do not use anything but solid shortening here, ie Crisco. The use of spray oils or vegetable oil at any point in the curing of the skillet is said to leave a sticky, brown, uneven cure.) You want this coating to be very thin. Put the skillet upside down on a rack in the middle of the oven. Put another rack directly under it with a piece of aluminum foil to catch the oil drippings. Let it bake for 2 hours. You may need the vent again. Now, let the skillet completely cool in the oven before moving it. The long cool down is essential. You should repeat these instructions in #2 one more time before actually using the skillet.
3. GENERAL CARE:
~Do not wash with soap after skillet is properly seasoned.
~Usually a rinse with hot water is all that is needed.
~For really caked on/burnt on food, put a little pure canola oil in the skillet. Pour Kosher salt into the pan to create a paste and use a clean sponge to scrub the burnt on food. The salt works as a scouring agent, and washes out easily. Wipe out the pan, apply a thin coating of shortening, and then wipe it off, and the piece is ready to be stored.
~Always dry the skillet well before storing.
The skillet you see in the picture with the cornbread is that very skillet that I seasoned using this method!
Labels: breads, buttermilk, cast iron skillets
By: Sharon Pickering | 12/13/2006 at 4:54 PM | | If you want, you can leave a comment by clicking here.

This cookie comes with a little story. When making my Christmas cookie list, I asked my husband what he wanted. He came up with such plain, un-Christmasy, cookies such as peanut butter, chocolate chips, oatmeal. Now, don't get me wrong, these cookies are
all delicious. They just don't scream Christmas to me. But, I thought I could turn the oatmeal request into something festive. I have always wanted to make Oatmeal Cranberry Cookies, so this was my big chance. I found the following recipe on the Ocean Spray website.
Oatmeal Cranberry White Chocolate Chunk Cookies
2/3 cup butter or margarine, softened
2/3 cup brown sugar
2 large eggs
1 ½ cups old-fashioned oats
1 ½ cups flour
1 teaspoon baking soda
½ teaspoon salt
1 6-ounce package dried cranberries
2/3 cup white chocolate chunks or chips
Preheat oven to 375ºF. Using an electric mixer, beat butter or margarine and sugar together in a medium mixing bowl until light and fluffy. Add eggs, mixing well. Combine oats, flour, baking soda and salt in a separate mixing bowl. Add to butter mixture in several additions, mixing well after each addition. Stir in sweetened dried cranberries and white chocolate chunks. Drop by rounded teaspoonfuls onto ungreased cookie sheets. Bake for 10-12 minutes or until golden brown. Cool on wire rack. Makes approximately 2 ½ dozen cookies.
To make them just a tad more festive, I used the other half of the white chocolate chips, melted with a bit of shortening to make a little drizzle topping!
Labels: cookies
By: Sharon Pickering | 12/10/2006 at 4:24 PM | | If you want, you can leave a comment by clicking here.
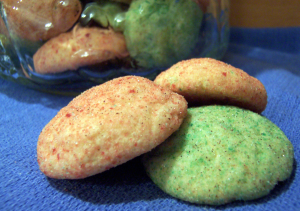
These all-time-favorites were brought over for our Christmas party by a friend. They are so good. I've always had a soft spot for snickerdoodles, but never thought about making them for Christmas. They made such a festive tray of cookies.
Christmas Doodles
2 ¾cups all-purpose flour
1 teaspoon baking soda
½ teaspoon fine salt
½ cup shortening
8 tablespoons (1 stick) unsalted butter, softened
1 ½ cups sugar
3 tablespoons colored sugar
2 large eggs
1 tablespoon ground cinnamon
Preheat the oven to 350 degrees F. Sift the flour, baking soda, and salt into a bowl. With a handheld or standing mixer, beat together the shortening and butter. Add the 1 ½ cups sugar and continue beating until light and fluffy, about 5 minutes. Add the eggs, 1 at a time, beating well after each addition. Add the flour mixture and blend until smooth. Mix the 3 tablespoons colored sugar with the cinnamon in a small bowl. Roll the dough, by hand, into 1 ½-inch balls. Roll the balls in the cinnamon sugar. Flatten the balls into ½-inch thick disks, spacing them evenly on unlined cookie sheets. Bake until light brown, but still moist in the center, about 12 minutes. Cool on a rack.
Lovely to look at and even better to eat!
Labels: cookies
By: Sharon Pickering | at 4:23 PM | | If you want, you can leave a comment by clicking here.

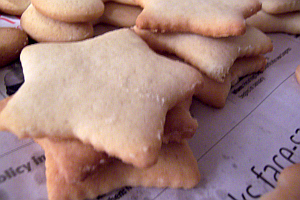
If ever there were a cookie that signifies Christmas to me, it is a spicy little one called Lebkuchen. It's an old family recipe passed from my Grandma to my Mother to me, and now to my daughter. My Grandma was German and she made these each year, as did my Mother. This recipe seems a little difficult , but it breaks down easily due to the mixing one day and baking the next.
Lebkucken
½ cup honey
½ cup molasses
¾ cup brown sugar
1 egg
1 Tablespoon lemon juice
2¾ cups flour
½ teaspoon baking soda
1 teaspoon ground cinnamon
1 teaspoon ground cloves
1 teaspoon allspice
1 teaspoon ground nutmeg
⅓ cup candied pineapple
⅓ cup chopped pecans
In medium size saucepan, mix honey & molasses. Bring to a boil. Cool. Stir in brown sugar, egg and lemon juice. Sift flour, baking soda, cinnamon, cloves, allspice and nutmeg and add to honey/molasses mixture. Stir in the candied pineapple and pecans. Chill dough overnight. Roll on floured board ¼" thick, keeping rest chilled. Cut with diamond shape cookie cutter. Place 1 inch apart on greased baking sheet. Bake at 400 degrees or until no imprint remains when cookie is lightly pressed; about 10-12 minutes. Store in an air tight container for 3-4 weeks to soften.
The hardest part about these cookies for me is the resting period. I hang my head when I say, seldom do my cookies make the entire resting period. Usually by the second day, even with the best of intentions, I've begun the nibbling. And so it starts...ever so innocently.
The glaze used for Lebkuchen is a simple sugar and water mixture. To make it easy, I suggest using a candy thermometer. Mine is not fancy...not that I wouldn't like a new fancy one, but it serves it purpose well by taking out the guess work.
Sugar Glaze
1 cup granulated sugar
½ cup water
¼ cup powdered sugar
Put the sugar and water in a saucepan. Bring to a boil and lower heat. Simmer 3 minutes or bring to 230° on a candy thermometer. Remove from heat and stir in powdered sugar. Use a pastry brush to paint on cookies. Makes about ¾ cup of glaze.
Labels: cookies
By: Sharon Pickering | 12/07/2006 at 8:04 PM | | If you want, you can leave a comment by clicking here.
This is a wonderful time of the year for baking. The weather is chilly and the kitchen is warm and cozy from baking cookies. The entire house takes on the gentle aroma of sugar cookies. Christmas cookies are perfect for holiday get togethers and gift giving. Or simply curl up next to the fireplace with a good novel, a cold glass of milk and a plate of cookies.
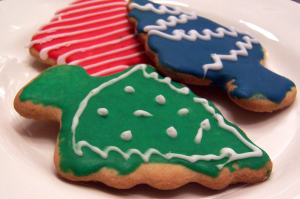
These Sugar Cookies are a recipe that my sweet Grandma use to make. The recipe was handed down to my Mother and to me and now to my daughter.
I have a little story about these cookies. The first time I made them we were living in a small trailer. I had no clue about cooking...let alone baking cookies. The recipe was rather vague concerning the flour because my Grandma didn't need much instruction when it came to cooking. It listed the ingredients, said to add flour and bake. No amount of flour was given. Nor did it say in what order to add the ingredients. With a call to my Mother, I found out you cream the sugar and shortening, add eggs, etc. But, I was on my own with the flour. I added, and added and added flour until it formed a dough. After the cookies had been baked, decorated and set out to dry, everu flat surface in my trailer was full of sugar cookies! The recipe takes between 7 1/2 - 8 cups of flour! My Grandma would bake cookies for her very large family and the farm hands and all her company.
I have to say this about my Grandma. She must of been a strong woman. It is no little feat beating the flour into the rest of the ingredients. I remember in years past how tired my arms would become. This year I blessed my Kitchen Aide Mixer over and over...it made short work of the cookie mixing process.
Grandma's Sugar Cookies
2 eggs
3 cups sugar
1 ½ cups shortening
1 ½ cups milk
1 teaspoon baking soda
2 teaspoons baking powder
1 teaspoon vanilla
pinch of salt
Flour enough to roll (or as it turns out usually 7 1/2 to 8 cups)
Cream sugar and shortening until light and fluffy. Beat eggs and add to sugar/shortening mixture. Stir in milk and vanilla. Add baking soda, baking powder and salt to a cup of flour and stir in. Add enough flour to roll dough. At this point you may chill the dough. Turn out about a fifth of the dough onto a flour covered board or pastry cloth. Roll about ¼" thick, and cut into shapes with cookie cutters. Bake at 350º for 14 minutes or until lightly golden brown. Cool and frost.
That takes us to the frosting recipe. For many years I only used powered sugar with a little milk and food coloring. Recently I discovered a wonderful recipe that makes a shiny hard icing.
Sugar Cookie Icing
1 cup confectioners' sugar
2 teaspoons milk
2 teaspoons light corn syrup
¼ teaspoon vanilla
assorted food coloring
In a bowl, stir together confectioners' sugar and milk until smooth. Beat in corn syrup and vanilla until icing is smooth and glossy. If icing is too thick, add more corn syrup. Divide into separate bowls, and add food colorings. Dip cookies, or paint them with a brush.
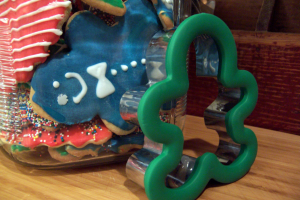
While making a mad dash through our little local grocery store last week, I found this fantastic cookie cutter! I think it really made a difference. I love the chunky cookie it makes. I searched online and found many others to choose from. My gingerbread boy cookie cutter was well worth the $2.99 I spent! I'm thinking the snowman and Christmas tree are on my 'to buy' list.
I forgot to mention that the decorating was done by my husband and my daughter! Didn't they do an awesome job?
Labels: cookies, kitchen aid mixer
By: Sharon Pickering | at 4:31 PM | | If you want, you can leave a comment by clicking here.


