
I would just like to thank all the little people that made this possible. To the poor person that obviously lost their mind and let this machine go. (I hope you are seeking help.) To the wonderful pricer at my local Goodwill Store that had a moment of insanity and put a $9 sticker on it. To the woman I ran over to get to the machine. (I hope that swelling goes down.) To all of you...a heart felt thank you!!
Yes, I am a proud owner of a new-to-me Zojirushi #BBCC-V20. I put it to the test today with a loaf of Basic White Buttermilk Bread for Zojirushi. Oddly enough, I've had this recipe for a long time and have made it often in my Breadman. It is an all-time family favorite. I never dreamed that one day I would actually be making it in a Zojirushi!
Basic White Buttermilk Bread for Zojirushi
1 1/4 cup buttermilk
2 Tablespoons butter
2 Tablespoons sugar
1 teaspoon salt
3 cups bread flour
2 teaspoons yeast
Measure milk, butter, sugar, salt and flur into baking pan. Sprinkle yeast in center of flour. Insert pan securely into baking unit and close lid. Select BASIC WHITE BREAD setting. Select MEDIUM baking degree setting. Press START. The COMPLETE light will flash when bread is done. Using hotpads, remove pan from unit and pull out kneading paddle. Turn out onto cooling rack and cool before slicing.
As you can see, the pan is oblong. What you can't see is the two paddles at the bottom for kneading. I think that makes all the difference. This machine does it all. I can even program it for different rising times! Or, just let the machine knead the dough, then shape it and bake it in my oven. When it did the kneading, it was quiet, and didn't walk across my counter.

Look how nice the bread rose, and just how darn pretty it is! (I get excited over bread.)

This bread tastes every bit as good as it looks. A beautiful, tender loaf of fresh bread.

Simply heaven.
Labels: bread machine, breads, buttermilk
By: Sharon Pickering | 3/06/2007 at 5:59 PM | | If you want, you can leave a comment by clicking here.

I made this banana bread for my brand new son-in-law, Robert! He married my daughter, Nikki, on New Year's Eve in our home. Very special wedding. But, sadly, he is leaving today to go back to Bermuda. Nikki has to stay behind until all paper work is finished. So, to ease the pain, I packed two loaves for him.
This recipe is a bit unusual. It is made with buttermilk, bananas and pineapple. It makes a great bread!
Banana Pineapple Bread
1 (8oz) can crushed pineapple with juice
3 bananas, mashed
3 eggs
3 cups all purpose flour
2 cups sugar
3/4 cup oil
3/4 cup buttermilk
1 tsp baking soda
1 tsp salt
1 tsp vanilla
sprinkle of allspice
Using my KitchenAid mixer*:
Place oil and sugar in mixer bowl. Attach the flat beater. Turn to Speed 6 and beat about 1 minute. Stop and scrape bowl. Continue on speed 6 about 1 minute longer. Add eggs. Turn to Speed 4 and beat 30 seconds. Stop and scrape bowl, Add buttermilk and vanilla, turn to Speed 6 and beat 1 1/2 minutes more.
Combine the dry ingredients in a bowl. Combine the bananas and pineapple in another bowl. To the large mixer bowl add 1/2 of the flour mixture and 1/2 of the banana/pineapple mixture. Using Stir speed, mix about 30 seconds. Add the remaining four and banana/pineapple mixture and beat for another 30 seconds.
Pour into loaf pans (greased on the bottom) and bake at 350° for about 1 1/2 hours. Cool 5 minutes then remove from pan and cool on wire rack.
*Instructions for hand mixing:
Blend ingredients in large bowl until completely moistened. Pour into pans and bake as directed above.
Robert use to take a bunch of bananas to his mother's house and he said by some miracle they would turn into bread and muffins! Since his mother is no longer with us, perhaps I can continue the miracle.
Labels: bananas, breads, buttermilk, desserts, kitchen aid mixer
By: Sharon Pickering | 1/06/2007 at 11:49 AM | | If you want, you can leave a comment by clicking here.

Not to get the cornbread controversy going, but I need to say up front I'm a fan of the sweet cornbread. This recipe is on the money. It makes a delightful skillet of cornbread that rises high and has a fine texture. If you are a fan of the sweet cornbread, then you will love this recipe!
Buttermilk Cornbread
1/4 pound butter
2/3 cup white sugar
2 eggs
1 cup buttermilk
1/2 teaspoon baking soda
1 cup cornmeal
1 cup all-purpose flour
1/2 teaspoon salt
Preheat oven to 375º. Grease an 8 inch cast iron skillet. Melt butter in skillet. Pour butter into mixing bowl. Return skillet to oven to keep hot. Add the sugar to the butter in the mixing bowl and mix well. Quickly add eggs to butter and beat until well blended. Combine buttermilk with baking soda and stir into bowl. Stir in cornmeal, flour, and salt until well blended and few lumps remain. Pour batter into the hot skillet. Bake in the preheated oven for 30 to 40 minutes.
A few years ago I purchased a cast iron skillet from Good Will. It was not very pretty...had rust. So, I did some research and found this way seemed the best for me. My method involves a self-cleaning oven.
Cast Iron Skillet Seasoning
1. TO PREPARE FOR SEASONING (and burning off old cure): First, scrub any loose rust off. I even took an SOS pad to it. Dry it off. Put in in your oven (do not put grease on it at this time) and run the self-clean cycle. You will probably have some smoke, so turn on the vents. Let it cool completely. When cool, brush off any remaining residue and scrub any left over stubborn spots with an SOS pad again.
2. TO SEASON: Preheat oven to 500º. Using your fingers or a kitchen towel, smear solid shortening over every surface and into every nook and cranny. (Important note here...do not use anything but solid shortening here, ie Crisco. The use of spray oils or vegetable oil at any point in the curing of the skillet is said to leave a sticky, brown, uneven cure.) You want this coating to be very thin. Put the skillet upside down on a rack in the middle of the oven. Put another rack directly under it with a piece of aluminum foil to catch the oil drippings. Let it bake for 2 hours. You may need the vent again. Now, let the skillet completely cool in the oven before moving it. The long cool down is essential. You should repeat these instructions in #2 one more time before actually using the skillet.
3. GENERAL CARE:
~Do not wash with soap after skillet is properly seasoned.
~Usually a rinse with hot water is all that is needed.
~For really caked on/burnt on food, put a little pure canola oil in the skillet. Pour Kosher salt into the pan to create a paste and use a clean sponge to scrub the burnt on food. The salt works as a scouring agent, and washes out easily. Wipe out the pan, apply a thin coating of shortening, and then wipe it off, and the piece is ready to be stored.
~Always dry the skillet well before storing.
The skillet you see in the picture with the cornbread is that very skillet that I seasoned using this method!
Labels: breads, buttermilk, cast iron skillets
By: Sharon Pickering | 12/13/2006 at 4:54 PM | | If you want, you can leave a comment by clicking here.
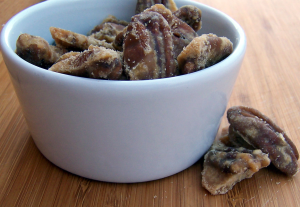
If it is praline goodness is what you are yearning for, look no further. This recipe will make you and all those around you happy! Great to give as gifts in a pretty little jar, or keep for yourself and sprinkle over a dish of vanilla ice cream.
Pecan Pralines
Makes About 4 Cups
2 cups sugar
1 cup buttermilk
1 teaspoon baking soda
2 tablespoons butter
4 to 4 1/2 cups pecan halves
In large (at least 6-quart) heavy saucepan, cook sugar, buttermilk, and soda on medium-high heat to soft-ball candy stage. (Syrup has reached the soft-ball stage at 234 to 240 degrees. When a small quantity is dropped in ice water, it forms a ball that keeps its shape, but when removed from the water, it flattens out by itself). Stir frequently to prevent burning. As candy cooks, it will turn golden brown. Remove from heat, and stir butter in . Add pecans, and stir to coat all nuts. Cover counter with wax paper, and pour pecans onto it. Immediately separate pecans. Let cool. Note: Works best when made on a day with low humidity.
I sprinkled mine on Apple Butter Pumpkin Pie!
UPDATE: I have entered this recipe in the Festive Food Fair that is hosted by Anna over at Morsels & Musings. Hurry on over to the Festival and join in!
Labels: appetizer, buttermilk, pecans
By: Sharon Pickering | 11/26/2006 at 3:26 PM | | If you want, you can leave a comment by clicking here.


