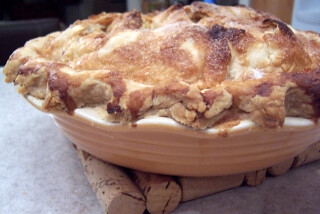
Pandowdy — a spoon pie, with fruit on the bottom and a rolled crust on top, which is broken up to allow the juices to come through.
My favorite thing. A pie. Simple. Delicious. This one is called a Pandowdy. Mine is a modified version. I like a bottom crust also. It is completely up to you.
Blackberry Pandowdy
Filling:
2 bags frozen blackberries
1/3 cup flour
1 cup sugar
cream for brushing
sugar for sprinkling
Pie crust (For a double crust pie, I make the 8 or 9 inch One-Crust plus the 8 or 9 inch Two -Crust because I like to work with lots of dough!)
Preheat oven to 375 degrees. Roll out a little over half of the dough as described in the pie crust recipe and place in the pie plate. Add the flour and sugar to the frozen blackberries. Toss gently to coat. Pour berry mixture over dough in pie plate. Roll the top crust out as described in the pie crust recipe and place over the berries. Crimp the edges to seal. Brush the top with cream (I usually use evaporated milk or plain milk...whatever I have on hand). Sprinkle top with sugar.
Bake until crust is set and beginning brown, about 45 minutes. Remove from the oven; gently push some of the crust into the filling using a spoon. Bake until crust is golden brown and crisp and juices are bubbling, 25 to 35 minutes more.
Now, eat and enjoy! Have a second piece. Kidding!!

Labels: desserts, pastry, pies
By: Sharon Pickering | 6/09/2008 at 1:47 PM | | If you want, you can leave a comment by clicking here.

This recipe is so terribly good. And it is just as easy. I got the recipe from the book that came with my Zojirushi bread machine. It is an all purpose roll recipe that can be used for dinner rolls and sweet rolls.
Butter-Rich Roll & Bread Dough
1 cup water
1 large egg
4 Tbsp. sugar
1 tsp. salt
3 Tbsp. dry milk
1/4 cup butter
3 1/4 cup bread flour
1 1/2 tsp. active dry yeast
Add ingredients in order listed. I use the Basic Dough setting on my bread machine, which kneads the dough and lets it rise. When done rising in the machine, remove the dough. Place on floured surface. I use my pastry frame. Divide dough in half. (At this point you can decide if you want all cinnamon rolls or make the other half into dinner rolls which is what I do.)
For Cinnamon Rolls:
1. Roll half of the dough into a 8 x 9" rectangle.
2. Spread the surface with about 1/4 cup softened butter.
3. Sprinkle surface with 1/4 cup brown sugar, 1 tsp. cinnamon and if you like raisins, 1/3 cup raisins
4. Roll dough jelly-roll style and pinch seam to seal
5. Cut in 12 pieces
6.Place in greased muffin tins, or baking sheet 2" apart
7.Cover with wax paper sprayed with oil and place a towel on top
8.Allow to rise in warm place until double in size - about 40 minutes
9.Bake at 375 degrees for 10-15 minutes.
10. Drizzle with icing.
If you decide to make the other half into dinner rolls, just divide up the dough into 12 pieces and place in lightly oiled muffin tins. Then follow steps 7, 8, 9.
They don't last long. No matter where you hide them. :-)
Labels: bread machine, breads, desserts
By: Sharon Pickering | 3/15/2008 at 5:23 PM | | If you want, you can leave a comment by clicking here.

My daughter is here for a visit, and I told her I would make whatever kind of pie she wanted. She wanted a chocolate pie...much to the joy of my husband. It is an old standby that the family has loved forever. In my opinion, a fruit pie tops a cream pie any day. But, like I said, that is my opinion.
Chocolate Pie
You need a baked pie crust. Dock the crust by poking holes on the bottom and sides with a fork and bake in a 425 degree oven until golden brown, about 15 to 20 minutes. (I left mine in a little too long, but it was still good.) While the crust is baking, make the filling and meringue.
Chocolate Pudding Filling
(an old word of mouth recipe from Imogene Baldwin)
3/4 cup sugar
1/3 cup flour
1/4 teaspoon salt
2 cups milk (I use one large can evaporated milk and make up the difference with milk)
2 eggs
2 tablespoons butter
1 teaspoon vanilla
3 tablespoons cocoa
In a saucepan mix the sugar, flour, salt, cocoa and eggs. Gradually stir in the milk over med-high heat, stirring constantly until the pudding becomes thick. Remove from heat and with a whisk, beat in the butter and vanilla until the pudding becomes smooth.
While the pudding is cooking, I make the meringue in my Kitchen Aid Mixer...it almost does it on it's own. But, keep a watchful eye on the pudding. You don't want it to burn. If you can't do both at once, do the meringue after you make the pudding.
Meringue Topping
4 egg whites
1/4 teaspoon cream of tartar
1/2 cup sugar
3/4 teaspoon vanilla
Beat the egg whites with the cream of tartar until foamy. Gradually add sugar a little bit at a time, beating after each addition making sure the sugar dissolves and stiff peaks form. Beat in the vanilla.
Pour the hot pudding in the baked pie crust. Spread the meringue topping over the pudding, creating a seal between the meringue and crust. Bake in a 425 degree oven until the meringue gets golden brown on the tips.
That is about it. Except for enjoying all the smiles and happy faces!
Labels: desserts, pie crust, pies
By: Sharon Pickering | 10/07/2007 at 4:54 PM | | If you want, you can leave a comment by clicking here.

I have been a long time fan of The Pioneer Woman Cooks. She does good, down home food. Yummy for your tummy. This bread pudding has been on my list to make.
Finally today was the day. I did make a couple of changes. I had a carton of Half and Half that I wanted to use, so I substituted that for the milk. I didn't have sour dough bread, but half a loaf of french bread. I didn't have pecans. (I didn't think this out very well, did I?) Lastly, I didn't have any whiskey in the house. (Where did it go?) I just added some vanilla to the sauce. I wanted to lick the plate. But, I have problems.
Be prepared. Your eyes will roll back in your head, and the only conversation at the table will be 'yummmm' or 'wow'. Or proposals of marriage.
The Best Bread Pudding
2 eggs
2 tablespoons melted butter
2 tablespoons vanilla
2 1/2 cups milk
2 cups sugar
3 1/2 to 5 cups sourdough bread, cut into 1-inch cubes
1/3 cup pecans, chopped finely
Preheat oven to 325 degrees. Beat together eggs, butter, vanilla, and milk. Add sugar and mix until sugar is dissoved. Arrange bread cubes tightly in a nine-inch baking dish, keeping the crust facing up around the edges in scattered within the dish. Pour liquid over the bread. Sprinkle pecans all over and bake for 55 to 70 minutes, or until crust is golden brown all over the top.
Whiskey Cream Sauce:
1/2 cup sugar
1 stick butter
1/2 cup cream
1/4 cup Jack Daniels
Combine all ingredients in a saucepan. Stir constantly over low heat until mixture reaches a low boil. Pour a small amount over the individual servings of bread pudding.
Store leftovers in fridge.
From The Pioneer Woman Cooks!
Labels: breads, desserts
By: Sharon Pickering | 9/12/2007 at 4:38 PM | | If you want, you can leave a comment by clicking here.

Spring must be in the air because last night we enjoyed strawberry shortcake for dessert. I wanted to make the shortcake, but I wanted a different twist on the old favorite. Not that strawberry shortcake ever needs to be improved...I just wanted to try something new. This was elegant and oh-so-yummy!!
Strawberry Shortcake Royale
1 package instant vanilla pudding
4 cups sliced fresh strawberries
1 cup sugar
1 1/2 cups Bisquick baking mix
1/2 cup sugar
1 egg
1/2 cup milk (can use skim)
2 tablespoons shortening (I used 1 tablespoon)
1 teaspoon vanilla extract
-Make pudding according to package directions. Cover and chill.
-Sprinkle strawberries with 1 cup sugar and let stand about 1 hour.
-Heat oven to 350 degrees. Blend remaining ingredients in large mixer bowl on low speed 1/2 minute, scraping bowl frequently. Beat 4 minutes on medium speed.
-Pour batter into a greased and floured square pan, 8x8x2".
-Bake 30 to 35 minutes or until wooden pick inserted in center comes out clean.Cool slightly and cut into squares. Split squares; spoon sweetened strawberries between layers and over top. Pour pudding mixture over all.
From Betty Crocker's Bisquick Cookbook Chapter Four "Be-My-Guest- Best" with adaptions by annie
I don't know why, but in my search to find a new recipe I pulled out my very old Bisquick cookbooks. Perhaps some of you may recall when Bisquick put a little cookbook in each box of Bisquick. My goal was to get every one of them. I don't know if I accomplished that, but I do have many of them. I was lucky enough to get, somewhere along the line, the notebook that Bisquick put out to corral and store all of those little cookbooks in!

If you are looking for an elegant, easy, low-fat, dessert...look no further. You have stumbled across just that!
Labels: cookbooks, desserts, strawberries
By: Sharon Pickering | 3/12/2007 at 5:58 PM | | If you want, you can leave a comment by clicking here.
This was a first for me. I bartered a pie for man-power. We had an armoir downstairs that, of course, we wanted upstairs. My husband kept bringing it up and looking at me like "Why don't we move it now?" I kept coming up with excuses...the shower drain is clogged, I have to clean the closet, I think my big toe is broke. The list went on and on. Until one day, it came to me . I asked him to call his friend and let me speak to him. Within the hour, I had a man at the door with bag of apples in hand, ready to move my end of the armoir!!! It was a defining moment in my life. My pies can move mountains!! (Well, at least move large bulky, extremely heavy pieces of furniture.) Not only did said friend move the armoir for me, he also peeled the apples. What a deal.
My husband, always on the lookout for a pie opportunity, wanted his own. He chose a pecan pie. It really turned out great.
Pecan Pie
2 eggs, slightly beaten
1 cup light corn syrup
1/4 cup brown sugar
1 Tbsp molasses
2 Tbsp melted butter
2 Tbsp flour
1/4 teaspoon salt
1 teaspoon vanilla
1 1/4 cups pecans
1 pie shell
1. Preheat oven to 375°F. Place the pecans in the bottom of the pie shell. Mix the remaining ingredients and pour over pecans. (The pecans will rise to the surface of the pie.)
2. Bake for 45-50 minutes until the filling has set.
3. Remove from oven and let cool completely.
This opens the door for all sorts of bartering. Mowing the lawn. Shoveling the snow. Clean the gutters. I have a million ideas!
Labels: desserts, pastry, pecans, pies
By: Sharon Pickering | 3/03/2007 at 1:26 PM | | If you want, you can leave a comment by clicking here.

I made this banana bread for my brand new son-in-law, Robert! He married my daughter, Nikki, on New Year's Eve in our home. Very special wedding. But, sadly, he is leaving today to go back to Bermuda. Nikki has to stay behind until all paper work is finished. So, to ease the pain, I packed two loaves for him.
This recipe is a bit unusual. It is made with buttermilk, bananas and pineapple. It makes a great bread!
Banana Pineapple Bread
1 (8oz) can crushed pineapple with juice
3 bananas, mashed
3 eggs
3 cups all purpose flour
2 cups sugar
3/4 cup oil
3/4 cup buttermilk
1 tsp baking soda
1 tsp salt
1 tsp vanilla
sprinkle of allspice
Using my KitchenAid mixer*:
Place oil and sugar in mixer bowl. Attach the flat beater. Turn to Speed 6 and beat about 1 minute. Stop and scrape bowl. Continue on speed 6 about 1 minute longer. Add eggs. Turn to Speed 4 and beat 30 seconds. Stop and scrape bowl, Add buttermilk and vanilla, turn to Speed 6 and beat 1 1/2 minutes more.
Combine the dry ingredients in a bowl. Combine the bananas and pineapple in another bowl. To the large mixer bowl add 1/2 of the flour mixture and 1/2 of the banana/pineapple mixture. Using Stir speed, mix about 30 seconds. Add the remaining four and banana/pineapple mixture and beat for another 30 seconds.
Pour into loaf pans (greased on the bottom) and bake at 350° for about 1 1/2 hours. Cool 5 minutes then remove from pan and cool on wire rack.
*Instructions for hand mixing:
Blend ingredients in large bowl until completely moistened. Pour into pans and bake as directed above.
Robert use to take a bunch of bananas to his mother's house and he said by some miracle they would turn into bread and muffins! Since his mother is no longer with us, perhaps I can continue the miracle.
Labels: bananas, breads, buttermilk, desserts, kitchen aid mixer
By: Sharon Pickering | 1/06/2007 at 11:49 AM | | If you want, you can leave a comment by clicking here.
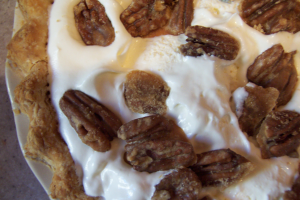
Here is another tasty pie recipe...just in time for the holidays. It adorned my Thanksgiving table, and may make a repeat appearance on my Christmas table. Yes, it was that good! The recipe is courtesy Paula Deen.
Apple Butter Pumpkin Pie
1 cup apple butter
1 cup fresh or canned pumpkin
1/2 cup packed brown sugar
1/2 teaspoon salt
3/4 teaspoon ground cinnamon
3/4 teaspoon ground nutmeg
1/8 teaspoon ground ginger
3 eggs, slightly beaten
3/4 cup evaporated milk
1 unbaked 9-inch pie shell
Sweetened whipped cream, for garnish
Preheat oven to 425°F.
Combine apple butter, pumpkin, sugar, salt and spices in a bowl. Stir in eggs. Gradually add milk and mix well. Pour into pie shell. Bake for about 40 minutes or until set.
Cook's Notes:
-If the crust begins to burn, place tin foil around the crust and lower the temperature of the oven.
-A tasty topping for this pie is Pecan Pralines.
I love the way this pie uses pumpkin and apples to make a pie full of spices. The apple butter packs a double punch. Not only do you get a hint of apple flavor, but it also adds it's own spices to the flavors. The pie has a slightly different texture than regular pumpkin...an improvement in my book.
Labels: apples, desserts, pies, pumpkin
By: Sharon Pickering | 11/27/2006 at 1:32 PM | | If you want, you can leave a comment by clicking here.
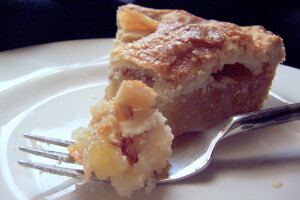
I really had not intended on another pie post so soon, but there have been some crust questions that must be answered. First off - people - don't be afraid of the crust. It is only a little pile of flour, shortening, salt and water. That is it. Nothing magical. Nothing mysterious. About as plain as it can get. But, if you simply can not muster up the courage to tackle the crust, my suggestion is - drink a glass of wine. Yes, a glass of wine is guaranteed to take the edge off and that crust will almost roll its self. Thinking about it, a glass of wine is how most of my cooking sessions start! If one doesn't help, have another. But, I wouldn't recommend more than two. Things will start to go downhill and, well, it could get ugly.
To make a pie crust, you must have certain tools of the trade. Just little items to make it painless.
The Tools:
Wonder Cup
Pastry Frame
Rolling pin
Pastry blender or a food processor
Pie plate
Mixing bowl
Spatula - I love my spatula for tossing the cold water in the flour
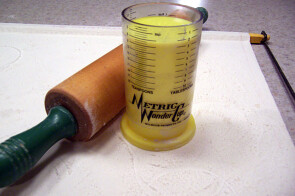
How would you measure 2/3 cup of shortening? I use the Wonder Cup. The unique design allows for no-struggle, mess-free measuring. To use, push the yellow cylinder down to the measurement mark you need and stuff the cylinder full of shortening, then level it off and push it into your bowl. Much easier than attempting to get your shortening out of a normal measuring cup.
Another pretty handy item to have around is a pastry frame. Not only is it necessary in my book for pie crusts, it is wonderful to roll out biscuits, bread and cookies. The official name of mine is the "Foley Pastry Frame". The unofficial name is "The Happy Thing" - named by my husband because every time I bring it out, he gets happy! It's very old and I don't think they make this particular brand any longer. But, there are other brands out there now. A pastry cloth will do if you can't find a pastry frame. The frame, while being convenient, is not necessary. It helps to hold the canvas 'pastry cloth' in place on your counter. Always remember to flour the canvas well before rolling out your pie crust. When finished using, shake out excess flour, roll up and store. (Mine is in a cardboard tube in a kitchen cabinet.)
The rolling pin is instrumental to the pie making process. Mine is not fancy, and once again very old. Hmmmm....seems most of my favorite, most used kitchen tools are old and well used. Anyway, you can find rolling pins in a variety of materials...marble, glass, steel, hollow plastic, wood. Mine is wood and it works like a pro. I suppose it is just a matter of preference, and I prefer wood. I like the way it looks and the way it feels. My pastry frame came with a stockinette rolling pin cover which keeps your dough from sticking to the rolling pin. Before rolling your crust, rub flour over the stockinette.
The last tools I will talk about are the pastry blender and food processor. For many years I used a pastry blender and never had a problem with it. But, recently I bought a food processor because it seemed like every recipe and every food show used one. Now I know why - they work! But, even after purchasing one, it took me a long time to finally decide to see how it would cut shortening into the flour. (Old habits die hard.) So, if you have a food processor, definitely use it for pie crusts. Put the flour, salt and shortening into the bowl and pulse it until it looks crumbly. I don't use the food processor to add the water, because I feel it would over work the dough at this point. If you don't have a food processor, don't fret over it. Just buy a little pastry blender for a few dollars. It will work just as well and make a wonderful flaky crust.
I can't remember exactly where I got my recipe, but I suspect it was from a Gold Medal flour bag, although I use any flour I have on hand. It has directions for a one-crust or a two-crust pie. Usually I will make both...enough for three crusts because I like to have plenty of pie crust to work with.
The Recipe:
~8 or 9 inch One-Crust Pie~
1 cup Gold Medal Flour
1/2 teaspoon salt
1/3 cup shortening
2 to 3 tablespoons cold water
~8 or 9 inch Two -Crust Pie~
2 cups Gold Medal Flour
1 teaspoon salt
2/3 cup shortening
4 to 5 tablespoons cold water
The Crust:
It is always easier to assemble everything before hand. Not saying that is what I do all the time, but when I do, the process is much smoother. If I really had forethought, I measure the shortening, cut into cubes, put into a bowl and set it in the refrigerator to get chilled. More often than not, my shortening doesn't get chilled. According to "Pie Authorities" that is a big no-no. But, my pies turn out great anyway. So, don't fret about that either. What I do, and I think this does make a difference, is get a little glass of water with ice at the beginning. That way when I'm ready to add the water it is good and cold.
To make the pie crust, add your flour, salt and shortening to a bowl or the food processor bowl if that is what you are using. Cut your shortening into the flour with the pastry blender or pulse the food processor until it resembles something between cornmeal and pea size chunks of flour/shortening.
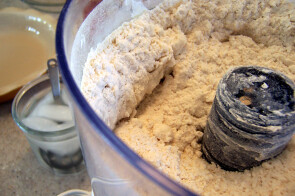
UPDATE: 11/17/06 I've had a couple of people ask what that black thing is. Well, curious readers, that is the center post of my snazzy Wolfgang Puck Food Processor! And that is the flour blended with the shortening in the processor bowl ready for the addition of water.)
Now the ice water gets added. If using a food processor I empty the flour mixture into another bowl because I don't like working around that middle pole of the processor bowl. Just me. Anyway, adding the ice water is critical. Don't laugh...it is. Too much water and you crust will be tough. Too little water and it will not hold together and crumble when putting it in the pie plate. This is the only part of the whole process that I actually pay attention. I will add the water, one tablespoon at a time, and keep count. I only keep count because it gives me a general guideline. I say guideline because the amount of water added to a pie varies from day to day, depending upon the humidity in the air. After each addition of water, I use a rubber spatula and gently toss the mixture. I keep doing this until the dough starts to form larger clumps and hold together.
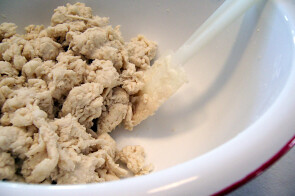
Some days I use more water, some days less. You will develop a feel for it.
When I think enough water has been added, I press it into a ball, handling it as little as possible. That is the golden rule after adding the water. Handle as little as possible. Anyway, press it into a ball and place on your floured pastry frame or pastry cloth. Press it flat into a disc. With your floured rolling pin, start rolling from the center to the edge. Sometimes I help keep the dough round by pressing the edges into shape with my hands into a circle.
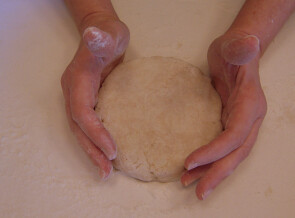
Most times just rolling from the center out will form a nice circle.
Now comes the part that use to make me crazy...getting the crust into the pie plate without it falling apart. I finally found a fool-proof way that works each and every time. If you are using a pastry frame, you will have to disconnect the frame to do this. After the crust is rolled out, place the rolling pin on the front edge of the pie closest to you.
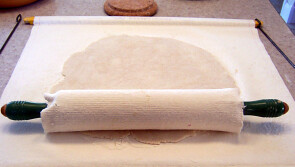
Gently pick up the front edge of your pastry cloth and pull it towards the back edge.
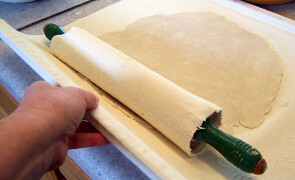
This motion wraps the crust around the rolling pin.
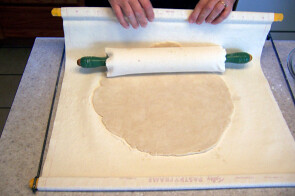

Place the pie plate in front of the rolling pin/crust.
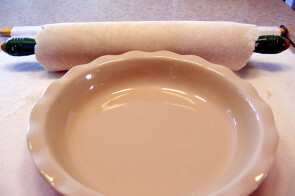
Lift the rolling pin and match the far edge of the crust with the far edge of the pie plate. Unroll the crust over the pie plate and the crust will fall into the pie plate!!
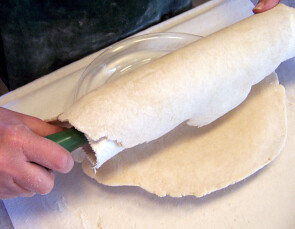
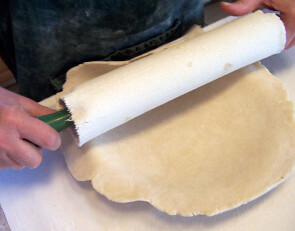
It is the greatest move I have ever perfected in the kitchen. No more torn crusts and patching them up. Perfection.
If you are making a cream pie, dock the crust. (Dock is taking a fork and poking holes in the crust.) Then bake in a 475 degree oven until lightly browned, usually about 10 minutes. If you are making a fruit pie, prepare your filling and put in the crust. You can put a little crumb topping over your fruit.
Crumb Topping:
1/2 cup sugar
1/2 cup flour
1/4 cup butter
Cut butter into flour and sugar until crumbly. Spoon over your fruit filling and bake as ususal.
Or if you are making a 2-crust pie, place the top crust over the filling in the same manner as above.
One last thing. Did you know that pie crusts freeze nicely? Most of the time I try to have a frozen pie crust or two in my freezer. I roll it out, put it in the pie plate, crimp the edges and wrap it in plastic.
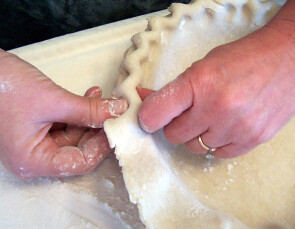
That way when you want a pie all you do is take it out, put the filling in, make the little crumb topping and bake. Really fast and easy. Great for last minute guests!
Labels: desserts, food processor, pastry, pie crust
By: Sharon Pickering | 11/12/2006 at 5:47 PM | | If you want, you can leave a comment by clicking here.
Let's just get it out there. We all have something we do better than the average person. Or it is our favorite thing to do. Or it is what you do best. For me, that is baking pies. As a matter of fact I came very close to naming this blog "Pie in the Sky" because - I love to make pies...I love eating pies...I make an awesome pie...My blog template's header image is a sky drawing (I choose "Buttermilk Clouds" for other reasons which is a whole new post.)
I will probably post about pies and pie paraphernalia often. :-) And, as luck would have it, I made a pie yesterday! For the first time I actually took some photos of the different phases of making a pie.
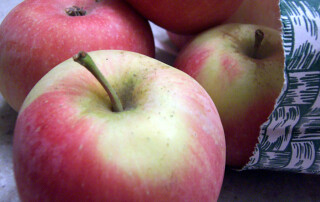
It is fall in Illinois, and we are lucky enough to live close to Mills Apple Farm. That is the starting point for all my best apple pies. Mills is a family-owned farm that I have gone to for, I guess, 25 years or more. My husband makes fun of me because I won't get my apples anywhere else. For me, it is so much more than the apple. I enjoy the ride in the country, seeing the trees heavy with ripe apples, looking at all their homemade jams and jellies, smelling the heady aroma of hay and ripe apples, getting a gallon of fresh cider and looking at their mums and fresh cut sunflowers.
Their apples are always crisp and juicy. Perfect for eating out of hand or tucking in a pie crust. I'm not so particular on the type of apple I use. Whatever is in season will do. My last batch of pies (and I mean batch...I made six and gave pies away to the neighbors) was Jonagold. Yesterday I used Fuji and Braeburn. I do think I get a slightly better pie if I use two different types of apples, but sometimes I only have one type and it turns out great. I do choose the biggest apples I can find for making pies. Simply because it reduces the peeling time. Depending on the size, I use 4-5 apples per pie.
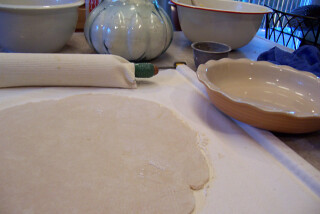
The base for all pies is the crust. Without that, well, all you have is hot fruit. I find that people are afraid of making a crust from scratch. When, in actuality, it is extremely simple to make. Years ago I found this recipe for a mixer pie crust: 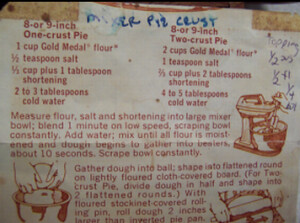
And for many years, I actually did use a handheld mixer to make it. Flaky and tasty. Eventually I decided it was too much of a bother getting the mixer out, and started using a pastry blender. Only recently, with the addition of a food processor (welcome to the 20th century), have I started using it to cut the shortening into the flour. Now, depending on my mood, I use either the food processor or the pastry blender. Each method works, with the processor edging out the pastry blender for ease. When I make a pie with a crust on top and bottom, I use the recipe for a 2 crust pie and a 1 crust pie (total 3 cups of flour altogether ... understand?). Reasoning...I like lots of crust to work with. Other little tips/quirks:
- I make a glass of water with ice in it first thing so it will be very cold when I add it to the mix
- If working alone (ie my husband isn't helping me peel apples) I will make the bottom crust first, roll it out, put it in the pie pan and put it in the refrigerator then get the filling ready.
- It truly depends on the humidity in the air as to how much water to add, so I gently toss the flour/shortening mixture after the addition of each tablespoon of ice water and when it starts to clump up and act like it will hold together good, I'm done adding water!
- After adding enough water, I handle the dough as little as possible (gather and gently press into a ball and roll gently) because it is at this point that if it is handled too much, it will be tough and not flaky.
- If I think ahead, I will measure out the shortening and put it in the refrigerator to chill. If not, I use it straight from the cupboard.
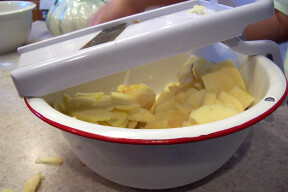
The pie filling itself is not a science. Using a mandolin (mine is a great inexpensive one from Progressive) makes slicing the apples a cinch. They come out thin and uniform. A huge bowl is done in minutes. Usually for 3-5 apples I use 1 1/2 cups-2 cups of sugar and about 1/4 cup flour. A sprinkling of cinnamon and a few pats of butter and it is done.
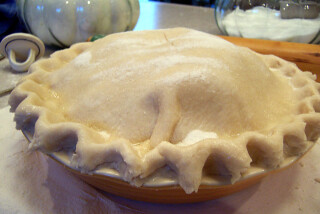
My newest fad for pies is making a double crust and completely sealing the top and bottom edges together. Then I brush with the top crust with heavy cream/half & half/ evaporated milk/milk...whatever I happen to have that day. After the milk brushing I sprinkle with sugar, cut an 'X' on the top and pop it in preheated 375 degree oven for about 45 minutes. At that point I get a big spoon and push sections of the crust into the filling randomly. Return it to the oven and bake another 23-35 minutes. I usually cover the edge of the crust with foil so it won't over brown. The bonus with baking it this way is the juices from the pie rarely overflow.
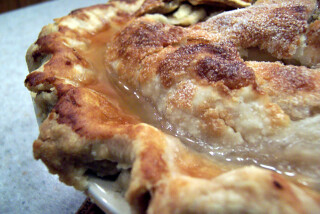
This method makes such a beautiful pie! All that is left to do is wait for it to cool (if you can) and enjoy a big slice. My husband likes it with ice-cream...I prefer it without. Either way, it is a taste sensation!!!
Labels: apples, desserts, food processor, mandolin, pastry, pie crust, pies
By: Sharon Pickering | 10/30/2006 at 3:43 PM | | If you want, you can leave a comment by clicking here.